


 Title Index
 Recently Changed
 Page Hierarchy
 Incomplete
 Tags
Tags


Tutorials > Getting Started
Welcome to FogBugz plugin development. In this tutorial, you will create a simple plugin that prints "Hello, world" on a new page in FogBugz. It will also place a link to the new page in the Extras menu. These functions are achieved by implements the IPluginPageDisplay and IPluginExtrasMenu interfaces, respectively. Plugins modify and add to the various areas of the FogBugz application by way of interfaces. Plugins can also use APIs to access to the various data objects.
This article assumes you have FogBugz 7 installed and are using Microsoft Visual Studio 2005 or 2008. The free version of Visual C# 2008 Express Edtion allows writing FogBugz plugins without having to purchase Microsoft Visual Studio.
We highly recommend that you install FogBugz locally on your development machine and test your Plugin there, rather than testing it on your live FogBugz server. This is safer and also facilitates debugging. See the Installing FogBugz Locally article for instructions on how to get a license for installing FogBugz locally.
Setting Up the Development Environment
-
Install FogBugz
Installation is beyond the scope of this tutorial. See Installing FogBugz Locally.
-
Install Microsoft Development Tools
You'll need to install Visual Studio (2005+) and the .NET 2.0 SDK. Follow the instructions provided on the product download pages.
-
Create a new project
-
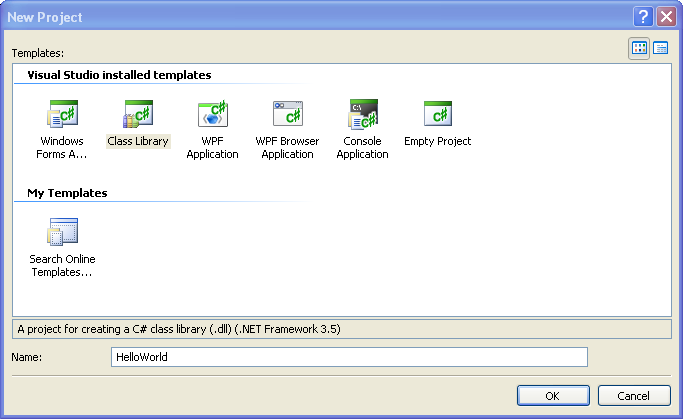
Using Visual Studio 2008
Select .NET Framework 2.0, then Visual C# as the type and Class Library as the template:

-
Using Visual Studio 2005
Select Visual C# as the type and Class Library as the template:

-
Using Visual C# 2008 Express
Select Class Library as the template:
-
Using Visual Studio 2008
-
Rename Class1.cs to HelloWorld.cs
Creating the Plugin
Adding References to FogBugz Assemblies
Every plugin will need references for the FogCreek.FogBugz and the FogCreek.Plugins libraries. They're all located in your FogBugz install directory under Website/bin/
[path to FogBugz]/Website/bin/FogBugz.dll
[path to FogBugz]/Website/bin/FogCreek.Plugins.dll
To add the references, go to Project > Add Reference..., then select the "Browse" tab and navigate to the files.
Assembly Attributes
Open AssemblyInfo.cs, located in the Solution Explorer under HelloWorld > Properties. Add the following required Assembly Attributes:
using FogCreek.Plugins;
[assembly: AssemblyFogCreekPluginIdAttribute("PluginName@YourDomain.com")]
[assembly: AssemblyFogCreekMajorVersionAttribute(3)]
[assembly: AssemblyFogCreekMinorVersionMinAttribute(5)]
[assembly: AssemblyFogCreekEmailAddressAttribute("YourEmail@YourDomain.com")]
[assembly: AssemblyFogCreekWebsiteAttribute("http://yourwebsite.com")]
- FogCreekPluginIdAttribute is a unique identifier for your plugin. We recommend the format "PluginName@YourDomain".
- FogCreekMajorVersionAttribute identifies the major verson of the Plugin API that your Plugin works with. The current major version is 3. See Plugin API Versioning for more information.
- FogCreekMinorVersionAttribute identifies the minimum minor version of the Plugin API that your Plugin requires. The current minor version is 5. See Plugin API Versioning for more information.
- FogCreekEmailAddressAttribute is the email address provided on the Plugin Page in FogBugz for your plugin. This should be the address where you would like to receive customer service emails from your users.
- FogCreekWebsiteAttribute is the URL which is linked to by your plugin's name on the Plugin Page in FogBugz.
You can also include a title, description, company, and version, which will show up when your Plugin is installed.
[assembly: AssemblyTitle("HelloWorld")]
[assembly: AssemblyDescription("A timeless classic. Now on FogBugz.")]
[assembly: AssemblyCompany("Your Company Name")]
[assembly: AssemblyVersion("1.0.0.0")]
[assembly: AssemblyFileVersion("1.0.0.0")]
Writing the Code
You're now ready to write the plugin class in HelloWorld.cs. Start by adding the namespaces we will use:
using FogCreek.FogBugz;
using FogCreek.FogBugz.Plugins;
using FogCreek.FogBugz.Plugins.Api;
using FogCreek.FogBugz.Plugins.Interfaces;
using FogCreek.FogBugz.UI;
To start, every FogBugz plugin must inherit from the Plugin class. This is the starting point for your Plugin. FogBugz will instantiate at most one Plugin object from each Plugin Assembly, and call interface methods on this object only.
public class HelloWorld : Plugin
{
public HelloWorld(CPluginApi api) : base(api)
{
}
}
Our constructor simply calls the constructor of the base class we inherit from (Plugin), passing it the api instance.
To make our plugin actually do something, we need to implement one or more Plugin Interfaces. You can see a complete list of interfaces that Plugins can implement in the FogBugz Plugin Interfaces. We want to have our plugin generate an HTML page, and put a link to it in the Extras menu, so we will implement two interfaces: IPluginPageDisplay and IPluginExtrasMenu.
public class HelloWorld : Plugin, IPluginPageDisplay, IPluginExtrasMenu
Because we are implementing the IPluginPageDisplay interface, our class must have the following methods: PageDisplay()and PageVisibility().
Note: Visual Studio and Visual C# Express make adding these methods easy. Once you type IPluginPageDisplay as an interface to implement, hover over IPluginPageDisplay and the "I" will be underlined. Hover over that and a menu appears. Click the menu and choose "Implement Interface 'IPluginPageDisplay'" and it will create the method stubs for you!
PageDisplay() returns the HTML we want to display, which is inserted within the normal FogBugz page layout. If we wanted a page with no header and footer, we would implement IPluginRawPageDisplay. If we needed to output binary data, we could implement IPluginBinaryPageDisplay. See How To Add a new page to FogBugz for all the page types you can add. The PageVisibility() method returns a value from the PermissionLevel enumeration, setting who can see our page. We want all normal, logged-in users to see it, so we return PermissionLevel.Normal.
public string PageDisplay()
{
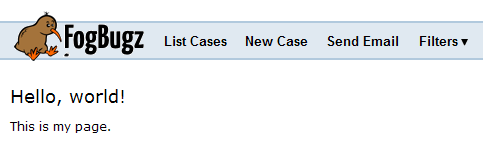
return "<h1>Hello, world!</h1><p>This is my page.</p>";
}
public PermissionLevel PageVisibility()
{
return PermissionLevel.Normal;
}
Our plugin page will be available at the URL http://your-fogbugz-url/default.asp?pg=pgPlugin&ixPlugin=XX where XX is your plugin's number. Since this isn't very easy to remember, we'll add a link to the page. Displaying a link in FogBugz is as easy as implementing another interface, IPluginExtrasMenu. This interface requires the ExtrasMenuLinks() method to be defined:
public CNavMenuLink[] ExtrasMenuLinks()
{
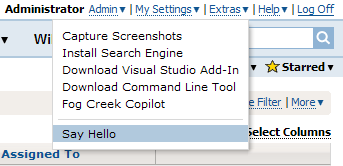
return new CNavMenuLink[] {new CNavMenuLink("Say Hello", api.Url.PluginPageUrl())};
}
This method returns a list of CNavMenuLinks. Each link has a title and a URL. Here we're generating one link. The URL is set by the api method Url.PluginPageUrl().
Installing and Using the Plugin
That's it! Compile your solution in Visual Studio, then find your dll and zip it up. Log into FogBugz as an administrator and install your zipped HelloWorld.dll by going to Admin -> Plugins. Click "Upload Plugin", browse to your zip and click OK to upload and install. If you built in Debug configuration (the default), you'll find your plugin under:
[path to your Project]/HelloWorld/bin/Debug/HelloWorld.dll
Test your new plugin by selecting "Say Hello" from your Extras menu.
You should see something like this:
Trouble-Shooting
See Plugin Debugging to learn how to attach a debugger to FogBugz in order to step through your plugin's execution.
Setting Up Automatic Uploading
If we're going to be working on this plugin a lot, going to FogBugz and clicking "Upload Plugin" every time we build can get annoying. If we have a local installation of FogBugz that we're using for testing (highly recommended), we can add a build step to automatically upload our plugin to FogBugz.
The "\Plugins\Upload" Directory
Every FogBugz installation includes a "\Plugins\Upload" directory. Any plugin .dll or .zip file placed into this folder will be automatically uploaded to FogBugz and installed. You can try it now by building your plugin and copying the DLL into this folder.
The FogBugz example plugins include a batch script that automatically zips up a plugin and copies it to this directory for uploading. You can find this script in:
[Your FogBugz Install]\Plugins\Examples\_postbuildSln.bat
Add the Build Step to the Project
- In Visual Studio, go to Project > HelloWorld Properties...
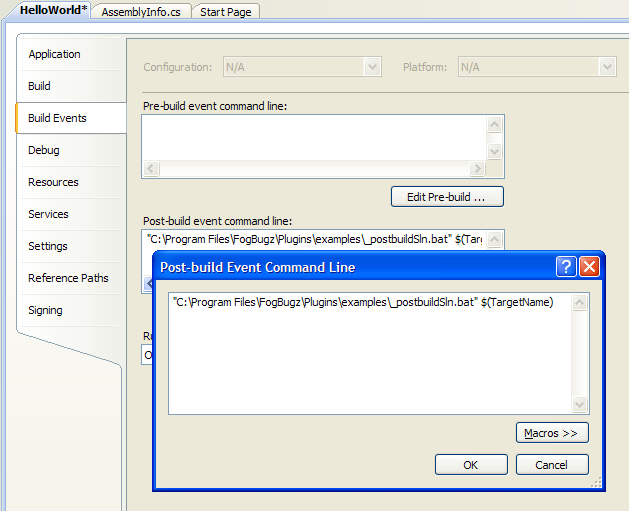
- In the pane that appears, select the "Build Events" tab
-
Under "Post-build event command line", add the line:
"[Your FogBugz Install]\Plugins\examples\_postbuildSln.bat" "$(TargetName)"
Note the quotes around the path and target name. If your path or plugin name contains spaces (e.g. "C:\Program Files") then you must have quotes for this step to work.
Screenshot:
- Test it by changing something in your code and rebuilding. FogBugz will automatically find your Plugin, upload it, and upgrade your Plugin to the newer version, all without you having to do anything!
Copy Static Content During Build
If your plugin has Static content served from the /static/ folder, you can add a build step to copy it to the output directory and the postbuild script will automatically add it when building:
xcopy /Y /I /S "[Your static directory]" "$(TargetDir)static"
For example, if your content is in a /static/ directory under your project directory, you would use:
xcopy /Y /I /S "$(ProjectDir)static" "$(TargetDir)static"
What Next?
- Try some more Tutorials
- Read the "How To" Guides for instructions on more specific Plugin functionality
- See a complete list of Complete Interface Example Library, including working examples
Complete HelloWorld.cs C# Code
1:
2:
3:
4:
5:
6:
7:
8:
9:
10:
11:
12:
13:
14:
15:
16:
17:
18:
19:
20:
21:
22:
23:
24:
25:
26:
27:
28:
29:
30:
31:
32:
33:
34:
35:
36:
37:
38:
/* FogBugz namespaces-- make sure you add the neccesary assembly references to
 * the following DLL files contained in C:\Program Files\FogBugz\Website\bin\
 * FogBugz.dll, FogCreek.Plugins.dll, FogCreek.Plugins.InterfaceEvents.dll     */

using FogCreek.FogBugz;
using FogCreek.FogBugz.UI;
using FogCreek.FogBugz.Plugins;
using FogCreek.FogBugz.Plugins.Api;
using FogCreek.FogBugz.Plugins.Interfaces;

namespace FogCreek.Plugins.HelloWorld
{
    /* Class Declaration: Inherit from Plugin, implement interfaces
     * IPluginPageDisplay and IPluginExtrasMenu */
    public class HelloWorld : Plugin, IPluginPageDisplay, IPluginExtrasMenu
    {
        /* Constructor: We'll just initialize the inherited Plugin class, which
         * takes the passed instance of CPluginApi and sets its "api" member variable. */
        public HelloWorld(CPluginApi api) : base(api)
        {
        }

        public string PageDisplay()
        {
            return "<h1>Hello, world!</h1><p>This is my page.</p>";
        }

        public PermissionLevel PageVisibility()
        {
            return PermissionLevel.Normal;
        }

        public CNavMenuLink[] ExtrasMenuLinks()
        {
            return new CNavMenuLink[] {new CNavMenuLink("Say Hello", api.Url.PluginPageUrl())};
        }
    }
}
